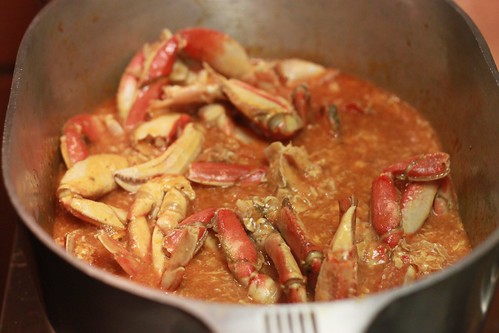
Sunday, February 1, 2009

Daring Bakers - a Charming Tuile!


...And, after several months of sadly neglecting my favorite bakers, I'm back! Or so I think.

Anyway, surprisingly enough, I made this challenge early in the month. I was dying to try out Mark Bittman's sorbet recipe and figured a tuile would be a wonderful accompaniment. Sure enough, it was.

They were not difficult to make or to shape, although I wish I had found the time to make them once more before the end of the month. I wanted to experiment with different shapes and flavorings, rather than my plain vanilla cones. Either way, I completed the challenge, which is more than I expected. :)

This month's challenge is brought to us by Karen of Bake My Day and Zorra of 1x umruehren bitte aka Kochtopf. They have chosen Tuiles from The Chocolate Book by Angélique Schmeink and Nougatine and Chocolate Tuiles from Michel Roux.

Tuiles
Preparation time batter 10 minutes, waiting time 30 minutes, baking time: 5-10 minutes per batch

65 grams / ¼ cup / 2.3 ounces softened butter (not melted but soft)
60 grams / ½ cup / 2.1 ounces sifted confectioner’s sugar
1 sachet vanilla sugar (7 grams or substitute with a dash of vanilla extract)
2 large egg whites (slightly whisked with a fork)
65 grams / 1/2 cup / 2.3 ounces sifted all purpose flour
1 table spoon cocoa powder/or food coloring of choice
Butter/spray to grease baking sheet

Oven: 180C / 350F

Using a hand whisk or a stand mixer fitted with the paddle (low speed) and cream butter, sugar and vanilla to a paste. Keep stirring while you gradually add the egg whites. Continue to add the flour in small batches and stir to achieve a homogeneous and smooth batter/paste. Be careful to not overmix.
Cover the bowl with plastic wrap and chill in the fridge for at least 30 minutes to firm up. (This batter will keep in the fridge for up to a week, take it out 30 minutes before you plan to use it).

Line a baking sheet with parchment paper or grease with either butter/spray and chill in the fridge for at least 15 minutes. This will help spread the batter more easily if using a stencil/cardboard template such as the butterfly. Press the stencil on the bakingsheet and use an off sided spatula to spread batter. Leave some room in between your shapes. Mix a small part of the batter with the cocoa and a few drops of warm water until evenly colored. Use this colored batter in a paper piping bag and proceed to pipe decorations on the wings and body of the butterfly.

Bake butterflies in a preheated oven (180C/350F) for about 5-10 minutes or until the edges turn golden brown. Immediately release from bakingsheet and proceed to shape/bend the cookies in the desired shape. These cookies have to be shaped when still warm, you might want to bake a small amount at a time or maybe put them in the oven to warm them up again. (Haven’t tried that). Or: place a bakingsheet toward the front of the warm oven, leaving the door half open. The warmth will keep the cookies malleable.

If you don’t want to do stencil shapes, you might want to transfer the batter into a piping bag fitted with a small plain tip. Pipe the desired shapes and bake. Shape immediately after baking using for instance a rolling pin, a broom handle, cups, cones….

Wednesday, January 7, 2009

Salsify, squid and sous vide...


One of those three things is going to change my life.

I'm talking about salsify. These little oyster root things are kind of hard to find, but a friend of mine was excited about them, so when I saw them at Central Market yesterday, I picked them up. The texture is similar to that of an artichoke heart and apparently, the taste is as well.

We prepared them with peaches, thyme, lemon juice and a touch of brown rice syrup. Then, we cooked them sous vide at 140 degrees F for about an hour. The result was a pleasantly toothy, almost apple-like dish. According to my friend, the peaches overshadowed the oyster-like flavor of the salsify, but I loved the dish. The salsify were sweet and cooked perfectly, thanks to sous vide, and the combination of the thyme and peach was refreshing. Unfortunately, no recipe for this one - it was more "fly by the seat of our pants," but was thoroughly enjoyable. I have more salsify in the fridge now that I'm planning on doing sous vide with some lamb.


Anyway, second course of the evening was squid with dandelion greens and Thai chilies. I adapted this from Mark Bittman - his Minimalist column in the New York Times is one of my favorites. I cooked the squid for maybe 30 seconds too long, but the greens were delightfully bitter and the chili (and a splash of nam pla at the end) added some spice.

Squid With Chilies and Greens
Adapted from Mark Bittman's The Minimalist.

3/4 pounds cleaned squid
1/2 pound, approximately, bitter greens like collards, kale, arugula or dandelion
3 tablespoons peanut or corn oil
1 chopped jalapeño or dried hot chili, or to taste
1 tablespoon chopped garlic, or to taste
Salt
Nam pla (fish sauce)

1. Separate squids' tentacles from bodies. Slice bodies into rings; cut tentacles in half if large. Rinse, and put in a strainer. Strip greens' leaves from stems; discard thickest stems. Chop, rinse and dry.
2. Put oil in a broad, deep skillet over high heat. Add chili and garlic, and stir until they sizzle. Add greens, and cook, stirring, until wilted, 2 minutes. Add squid and a large pinch of salt, and cook, stirring occasionally, until squid gives up its liquid and becomes opaque, about 2 minutes. Taste, and adjust seasoning, adding a splash of nam pla. Serve immediately.

Tuesday, January 6, 2009

I've still been bad!

Wow, how many months since I've posted? Too many, that's for certain.

Anyway, life and school and so many other things have caught up with me. That's not to say that I haven't been cooking (or eating, duh!), but it's definitely taken a back burner in light of other things.

Anyway, I'm ready to get back in the kitchen - I'm pumped for this month Daring Baker's Challenge and have a few new cookbooks to hopefully lead me into the New Year.

Until I actually make good on cooking something, I leave you with a photo of my Christmas dinner this year - standing rib roast, roasted sweet potatoes, sage stuffing and green beans with mushrooms.

Monday, September 1, 2008

Oh, no! I'm so bad!

First, before you all go and get any ideas: I DID complete this month's DB challenge of chocolate eclairs. Alas, I did so so early in the month that I didn't take photos. I figured, "Oh, well, these aren't great and it's only August 2nd, so I'll make these again before the end of the month."

You know how that goes. Life got in the way, so in the rush of fleeting summer, no more pate choux or pastry cream graced my kitchen.

However, I do have a few reflections on the experience. My one gripe with the recipe was that the pate choux seemed very eggy. I know I'm not the only one who felt this way, as I read of many other DBers with the same sentiment. Luckily for me, the pastry did rise in the oven and a few of them even hollowed out. My pastry cream was good, however the chocolate was overwhelming for me. I would like to try the eclairs, sans one egg and with a vanilla pastry cream.

See you next month (or maybe sooner, if I make anything worthwhile!) ;)

Wednesday, July 30, 2008

And another one bites the dust!


So, I am a bit late with posting this month but I did, in fact, complete the challenge. I’m planning on updating this post and elaborating about my experiences, but all in all, I enjoyed making this cake even though it wasn’t my personal favorite. It was certainly a challenge and I enjoyed learning different techniques, particularly regarding the genoise.

Almond Gateau with Praline Buttercream

From Great Cakes by Carol Walter


1 Almond Genoise

1 recipe sugar syrup, flavored with dark rum

1 recipe Praline Buttercream

½ cup heavy cream, whipped to soft peaks

1 recipe Blueberry Glaze

1 recipe Ganache Glaze, prepared just before using

3 tablespoons almonds, toasted and coarsely chopped


Almond Genoise


Because of the amount of nuts in the recipe, this preparation is different from a classic genoise.


1 ½ cups almonds, toasted/skinned

2/3 cup cake flour, unsifted

2 Tbsp. cornstarch

7 large egg yolks
1 cup sugar, divided ¼ & ¾ cups

1 tsp. almond extract

½ tsp. grated lemon rind

5 lg. egg whites

¼ cup warm, clarified butter (100 – 110 degrees)


Position rack in the lower 3rd of the oven and preheat to 350 degrees.  Grease and flour a 10” X 2” inch round cake pan. 

Using a food processor, process nuts, cake flour, and cornstarch for about 30 seconds.  Then, pulse the mixture about 10 times to get a fine, powdery mixture.  You’ll know the nuts are ready when they begin to gather together around the sides of the bowl. While you want to make sure there aren’t any large pieces, don’t over-process.  Set aside.


Put the yolks in the bowl of an electric mixer, with the whisk attachment, and beat until thick and light in color, about 3-4 minutes on med-high speed. Slowly, add ¾ cup of sugar.  It is best to do so by adding a tablespoon at a time, taking about 3 minutes for this step.  When finished, the mixture should be ribbony.  Blend in the vanilla and grated lemon rind.  Remove and set aside.

Place egg whites in a large, clean bowl of the electric mixer with the whisk attachment and beat on medium speed, until soft peaks. Increase to med-high speed and slowly add the remaining ¼ cup of sugar, over 15-20 seconds or so.  Continue to beat for another ½ minute.  
Add the yolk mixture to the whites and whisk for 1 minute. 


Put the nut meal in a mesh strainer (or use your hand – working quickly) and sprinkle it in about 2 tablespoons at a time – folding it carefully for about 40 folds.   Be sure to exclude any large chunks/pieces of nuts. Again, work quickly and carefully as to not deflate the mixture. When all but about 2 Tbsp. of nut meal remain, quickly and steadily pour the warm butter over the batter.  Then, with the remaining nut meal, fold the batter to incorporate, about 13 or so folds. 

With a rubber spatula, transfer the batter into the prepared pan, smoothing the surface with the spatula or back of a spoon. 

If collected butter remains at the bottom of the bowl, do not add it to the batter!  It will impede the cake rising while baking.
 Tap the pan on the counter to remove air bubbles and bake in the preheated oven for 30-35 minutes. You’ll know the cake is done when it is springy to the touch and it separates itself from the side of the pan.  Remove from oven and allow to stand for 5 minutes.  Invert onto a cake rack sprayed with nonstick coating, removing the pan.  Cool the cake completely.

Sugar Syrup

Makes 1 cup, good for one 10-inch cake – split into 3 layers


1 cup water

¼ cup sugar

2 Tbsp. dark rum or orange flavored liqueur


In a small, yet heavy saucepan, bring the water and sugar to a boil and simmer for 5 minutes. Remove from heat, add the liqueur. Cool slightly before using on the cake. 

Praline Buttercream

1 recipe Swiss Buttercream

1/3 cup praline paste

1 ½ - 2 Tbsp. Jamaican rum (optional)


Blend ½ cup buttercream into the paste, then add to the remaining buttercream.  Whip briefly on med-low speed to combine.  Blend in rum.


Swiss Buttercream

4 lg. egg whites

¾ cup sugar

1 ½ cups (3 sticks) unsalted butter, slightly firm

1 ½ -2 Tbsp. Grand Marnier or liqueur of your choice

1 tsp. almond extract


Place the egg whites in a lg/ bowl of a electric mixer and beat with the whisk attachment until the whites are foamy and they begin to thicken (just before the soft peak stage). Set the bowl over a saucepan filled with about 2 inches of simmering water, making sure the bowl is not touching the water. Then, whisk in the sugar by adding 1-2 tablespoon of sugar at a time over a minutes time. Continue beating 2-3 minutes or until the whites are warm (about 120 degrees) and the sugar is dissolved.  The mixture should look thick and like whipped marshmallows.
Remove from pan and with either the paddle or whisk attachment, beat the egg whites and sugar on med-high until its a thick, cool meringue – about 5-7 minutes. Set aside.


Place the butter in a separate clean mixing bowl and, using the paddle attachment, cream the butter at medium speed for 40-60 seconds, or until smooth and creamy. Do not overbeat or the butter will become too soft.

 On med-low speed, blend the meringue into the butter, about 1-2 Tbsp. at a time, over 1 minute.  Add the liqueur and vanilla and mix for 30-45 seconds longer, until thick and creamy.

 Refrigerate 10-15 minutes before using.


Praline Paste

1 cup (4 ½ oz.) almonds, toasted/skinless

2/3 cup Sugar


Line a jelly roll pan with parchment and lightly butter. 

Put the sugar in a heavy 10-inch skillet.  Heat on low flame for about 10-20 min until the sugar melts around the edges. Do not stir the sugar. Swirl the pan if necessary to prevent the melted sugar from burning. Brush the sides of the pan with water to remove sugar crystals.  If the sugar in the center does not melt, stir briefly. When the sugar is completely melted and caramel in color, remove from heat. Stir in the nuts with a wooden spoon and separate the clusters. Return to low heat and stir to coat the nuts on all sides.  Cook until the mixture starts to bubble. 

Then, pour onto the parchment lined sheet and spread as evenly as possible. As it cools, it will harden into brittle. Break the candied nuts into pieces and place them in the food processor.  Pulse into a medium-fine crunch or process until the brittle turns into a powder. To make paste, process for several minutes. Store in an airtight container and store in a cook dry place.  Do not refrigerate.


Blueberry Glaze

Good for one 10-inch cake


2/3 cup thick blueberry preserves

1 Tbsp. water


In a small, yet heavy saucepan, bring the water and preserves to a slow boil and simmer for 2-3 minutes. If the mixture begins to stick to the bottom of the saucepan, add water as needed.

Remove from heat and, using a strainer, press the mixture through the mesh and discard any remnants. With a pastry brush, apply the glaze onto the cake while the cake is still warm.  If the glaze is too thick, thin to a preferred consistency with drops of water.


Ganache Glaze

Makes about 1 cup, enough to cover the top and sides of a 9 or 10 inch layer or tube cake
6 oz. (good) semisweet or bittersweet chocolate, like Lindt

6 oz. (¾ cup heavy cream
1 tbsp. light corn syrup

1 Tbsp. Grand Marnier, Cointreay, or dark Jamaican rum (optional)

¾ tsp. vanilla

½ - 1 tsp. hot water, if needed


Blend vanilla and liqueur/rum together and set aside. 

Break the chocolate into 1-inch pieces and place in the basket of a food processor and pulse until finely chopped.  Transfer into a medium sized bowl and set aside. 

Heat the cream and corn syrup in a saucepan, on low, until it reached a gentle boil.  Once to the gently boil, immediately and carefully pour over the chocolate.  Leave it alone for one minute, then slowly stir and mix the chocolate and cream together until the chocolate is melted and incorporated into the cream. Carefully blend in vanilla mixture. If the surface seems oily, add ½ - 1 tsp hot water. The glaze will thicken, but should still be pourable. If it doesn’t thicken, refrigerate for about 5 minutes, but make sure it doesn’t get too cold!


Assembling Cake


Cut a cardboard disk slightly smaller than the cake.  Divide the cake into 3 layers and place the first layer top-side down on the disk. Using a pastry brush, moisten the layer with 3-4 Tbsp. of warm sugar syrup. Measure out 1 cup of praline buttercream and set aside.

Spread the bottom layer with a ¼-inch thickness of the remaining buttercream.  Cover with ½ of the whipped cream, leaving ¼-inch border around the edge of the cake.  Place the middle layer over the first, brush with sugar syrup, spreading with buttercream.

Moisten the cut side of the third layer with additional sugar syrup and place cut side down on the cake.  Gently, press the sides of the cake to align the layers. Refrigerate to chill for at least 30 minutes. 

Lift the cake by sliding your palm under the cardboard. Holding a serrated or very sharp night with an 8-ich blade held parallel to the sides of the cake, trim the sides so that they are perfectly straight. Cut a slight bevel at the top to help the glaze drip over the edge. Brush the top and sides of the cake with warm blueberry glaze, sealing the cut areas completely.  Chill while you prepare the ganache.


Place a rack over a large shallow pan to catch the ganache drippings.  Remove the gateau from the refrigerator and put it the rack. With a metal spatula in hand, and holding the saucepan about 10 inches above the cake, pour the ganache onto the cake’s center.  Move the spatula over the top of the ganache about 4 times to get a smooth and mirror-like appearance.  The ganache should cover the top and run down the sides of the cake. When the ganache has been poured and is coating the cake, lift one side of the rack and bang it once on the counter to help spread the ganache evenly and break any air bubbles. (Work fast before setting starts.) Patch any bare spots on the sides with a smaller spatula, but do not touch the top after the “bang”.  Let the cake stand at least 15 minutes to set after glazing.


To garnish the cake, fit a 12 – 14-inch pastry bag with a #114 large leaf tip. Fill the bag with the reserved praline cream.  Stating ½ inch from the outer edge of the cake, position the pastry tube at a 90 degree angle with the top almost touching the top of the cake. Apply pressure to the pastry bag, moving it slightly toward the center of the cake.  As the buttercream flows on the cake, reverse the movement backward toward the edge of the cake and finish by pulling the bag again to the center. Stop applying pressure and press the bag downward, then quickly pull the tip up to break the flow of frosting.  Repeat, making 12 leaves evenly spaced around the surface of the cake. 

Make a second row of leaves on the top of the first row, moving the pastry bag about ¾ inch closer to the center.  The leaves should overlap.  Make a 3rd row, moving closer and closer to the center. Add a 4th row if you have the room. But, leave a 2-inch space in the center for a chopped almond garnish.

Refrigerate uncovered for 3-4 hours to allow the cake to set. Remove the cake from the refrigerator at least 3 hours before serving.

Leftover cake can be covered with foil and kept in the refrigerator for up to 5 days.

Sunday, June 29, 2008

Another challenge down!


Okay, so I will admit that I was not particularly thrilled when I read the June Daring Baker's Challenge. Fun, but, eh, a Danish braid? So what?

Well, ultimately, I was wrong. The challenge taught me skills that I was definitely lacking (butter block, anyone!?) and ended up being really quite tasty. I chose a peach cream cheese filling for the braid you see here, although I did make two others later (no photos, sorry!). One of those was a pineapple-strawberry filling and the other was a mint-chocolate cream cheese filling. Did I mention that I like cream cheese? In addition to learning about butter blocks and Danish dough, I did also gather that my rolling pin skills are extremely deficient. Always nice to have something to work on, I suppose.

Danish Dough
Makes 2 1/2 pounds of dough.
Adapted from Sherry Yard’s the Secrets of Baking

For the dough (Detrempe)
1 tablespoon active dry yeast
1/2 cup milk
1/3 cup sugar
Zest of 1 orange, finely grated
3/4 teaspoon ground cardamom
1 1/2 teaspoons vanilla extract
1/2 vanilla bean, split and scraped
2 large eggs, chilled
1/4 cup fresh orange juice
3 1/4 cups all-purpose flour
1 teaspoon salt

For the butter block (Beurrage)
1/2 pound (2 sticks) cold unsalted butter
1/4 cup all-purpose flour

Dough
Combine yeast and milk in the bowl of a mixer fitted with the paddle attachment and mix on low speed. Slowly add sugar, orange zest, cardamom, vanilla extract, vanilla seeds, eggs, and orange juice. Mix well. Change to the dough hook and add the salt with the flour, 1 cup at a time, increasing speed to medium as the flour is incorporated. Knead the dough for about 5 minutes, or until smooth. You may need to add a little more flour if it is sticky. Transfer dough to a lightly floured baking sheet and cover with plastic wrap. Refrigerate for 30 minutes.

Butter Block
Combine butter and flour in the bowl of a mixer fitted with a paddle attachment and beat on medium speed for 1 minute. Scrape down the sides of the bowl and the paddle and then beat for 1 minute more, or until smooth and lump free. Set aside at room temperature.

After the detrempe has chilled 30 minutes, turn it out onto a lightly floured surface. Roll the dough into a rectangle approximately 18 x 13 inches and ¼ inch thick. The dough may be sticky, so keep dusting it lightly with flour. Spread the butter evenly over the center and right thirds of the dough. Fold the left edge of the detrempe to the right, covering half of the butter. Fold the right third of the rectangle over the center third. The first turn has now been completed. Mark the dough by poking it with your finger to keep track of your turns, or use a sticky and keep a tally. Place the dough on a baking sheet, wrap it in plastic wrap, and refrigerate for 30 minutes.

Place the dough lengthwise on a floured work surface. The open ends should be to your right and left. Roll the dough into another approximately 13 x 18 inch, ¼-inch-thick rectangle. Again, fold the left third of the rectangle over the center third and the right third over the center third. No additional butter will be added as it is already in the dough. The second turn has now been completed. Refrigerate the dough for 30 minutes.

Roll out, turn, and refrigerate the dough two more times, for a total of four single turns. Make sure you are keeping track of your turns. Refrigerate the dough after the final turn for at least 5 hours or overnight. The Danish dough is now ready to be used. If you will not be using the dough within 24 hours, freeze it. To do this, roll the dough out to about 1 inch in thickness, wrap tightly in plastic wrap, and freeze. Defrost the dough slowly in the refrigerator for easiest handling. Danish dough will keep in the freezer for up to 1 month.

Peach Cream Cheese Filling
Makes enough for two braids.
Adapted from Epicurious.com

8 oz. cream cheese
3/4 cup powdered sugar
1/4 cup whipping cream
1 teaspoon vanilla extract
1/2 teaspoon almond extract
3 large peaches, pealed, pitted, sliced

Blend cream cheese in a food processor until smooth. Add sugar, cream and extracts and blend until very smooth, occasionally scraping the down the sides of the bowl.

When filling the braid, arrange sliced peaches on top of the cream cheese mixture.

Danish Braid
Makes enough for 2 large braids.

1 recipe Danish Dough
2 cups of filling

For the egg wash: 1 large egg, plus 1 large egg yolk
Line a baking sheet with a silicone mat or parchment paper. On a lightly floured surface, roll the Danish Dough into a 15 x 20-inch rectangle, ¼ inch thick. If the dough seems elastic and shrinks back when rolled, let it rest for a few minutes, then roll again. Place the dough on the baking sheet.

Along one long side of the pastry make parallel, 5-inch-long cuts with a knife or rolling pastry wheel, each about 1 inch apart. Repeat on the opposite side, making sure to line up the cuts with those you’ve already made.

Spoon the filling you’ve chosen to fill your braid down the center of the rectangle. Starting with the top and bottom “flaps”, fold the top flap down over the filling to cover.

Next, fold the bottom “flap” up to cover filling. This helps keep the braid neat and helps to hold in the filling. Now begin folding the cut side strips of dough over the filling, alternating first left, then right, left, right, until finished. Trim any excess dough and tuck in the ends.


Egg Wash
Whisk together the whole egg and yolk in a bowl and with a pastry brush, lightly coat the braid.

Proofing and Baking
Spray cooking spray onto a piece of plastic wrap, and place over the braid. Proof at room temperature or, if possible, in a controlled 90 degree F environment for about 2 hours, or until doubled in volume and light to the touch.

Near the end of proofing, preheat oven to 400 degrees F. Position a rack in the center of the oven.


Bake for 10 minutes, then rotate the pan so that the side of the braid previously in the back of the oven is now in the front. Lower the oven temperature to 350 degrees F, and bake about 15-20 minutes more, or until golden brown. Cool and serve the braid either still warm from the oven or at room temperature. The cooled braid can be wrapped airtight and stored in the refrigerator for up to 2 days, or freeze for 1 month.

Monday, June 16, 2008

So, where have I been, you ask?


...To be entirely honest, in the kitchen. But not baking. I know that's an odd deviation, not to mention a travesty, but I'm one week into a 21-day detox. Not to lose weight, but rather to rid myself of toxins, see what my allergies do, etc. However, the first ten days of said detox are nothing but fruits and vegetables. Yes. You read that right.

FRUITS AND VEGETABLES.

No sugar, no flour, no beans, nothing processed. Luckily, I can use any spices I want and can eat as much of anything as I want. Basically, my life has been consumed with food. I've done extremely well thus far and am discovering lots of fun ways to experiment. Luckily for me, my food blogging community has provided me with lots of good things to try.

Wish me luck (and patience and perseverance!)

Thai Lemongrass Soup

3/4 cup tomatoes, finely chopped
2 to 3 small green Thai chilies, seeded and halved
2 Tbs. Tamari
4 cups vegetable broth
2 lemongrass stalks, peeled and cut into 4-inch pieces
3 dried Kaffir lime leaves
1 tsp. olive oil
2 tsp. garlic, minced
1 tsp. ginger, peeled and minced
2 tsp. Sriracha chili sauce
1 1/2 cups Portobella mushrooms, chopped
2 Tbs. fresh lime juice

In a medium saucepan, bring vegetable broth to a simmer with lemongrass stalks, chilies and lime leaves. Meanwhile, in a small skillet, heat oil over medium-high heat. Add ginger and garlic and cook, stirring, for about 30 seconds.

After broth has simmered for about five minutes, remove from heat and discard lemongrass, chilies and lime leaves. Add garlic and ginger. Return to boil and add in chili paste and mushrooms, cooking for about 30 seconds or until mushrooms are wilted. Stir in lime juice and tamari, Remove from heat.

Ladle into serving bowls, topping with cilantro and tomatoes.